
 Sew, Mama, Sew is having a tutorial contest!!!!
So - I thought I would try to do a tutorial, and today I had to make some sit-upons for a Girl Scout event my daughter and I are attending this evening... so I meshed the two together! Taylor Anne enjoyed 'helping' with this tutorial! (Anderson too!)

If you don't know what a sit-upon is ... well - it's something you sit-upon... on the ground, and it's designed to keep your heiny from getting wet or (too) dirty while sitting on the ground (or even on an aluminum stadium seat!). It's also usually a little cushiony, but doesn't have to be. My first sit-upon was made (by me) as a brownie I think, and we used folded up newspaper stuck inside some ugly thick plastic stuff. They weren't very comfortable, and also weren't very pretty - so I decided that the ones my daughter's troop would have could be a little better... Here's what I did...
Materials:
**Yardage of flannel-backed vinyl tablecloth fabric (chose something pretty!)
**1 1/2 inch foam sheeting cut into heiny-sized squares or rectangles (mine are cut into 15" squares)
**Sewing machine with strong thread (not particular, just something relatively strong)
**hole puncher or sharp scissors to punch holes through fabric layers
**yarn (not particular, could be twine or thinner nylon roping)
**Clear packing tape to make the end of the yarn stiff... so you can sew with it! (You could use a large blunt-pointed needle if you have one!)

Step 1 - lay your fabric out folded in half lengthwise, right sides together, and lay the foam square on top... cut the fabric so you have 2 inches on either side of the square, leaving the extra on the 'top' end. You will have a long rectangle of fabric folded over. Mine ended up being about 19" wide by 26" long when left folded. Pin the two long edges, and sew with a 1/2" seam, leaving the end open. You have created an inside-out bag.

Step 2 - Turn right-side out, straightening the corners, then stuff the foam peice into the bag all the way to the bottom. It will be snug. It helps if you roll up the foam and shove it to the bottom then let it open up in there and adjust around it.

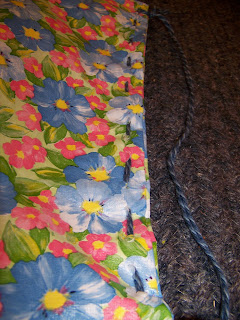
Step 3 - Fold the excess fabric into the bag, keeping it relatively straight at the top opening, then punch holes 1/2" in from the turned edge, and about 1/2 inch apart. These will be to thread the yarn through and close the bag. 
Step 4 - Using a large blunt-pointed needle, (or just wrap the end of the yarn with the packing tape to make a strong point) thread the yarn through the holes, closing up the bag. You may use an overhand stitch, a running stitch, blanket stitch, or whatever your girl would like to do - this is the part she should be doing herself anyway! I did a blanket stitch on mine, and Taylor Anne chose the running stitch...


Tie it off, maybe add a loop at the end of your stitching if you would like a 'handle'... and you're done! Mine doesn't have a handle, Taylor Anne's has a long loop that she can wear across her body, messenger bag style.
**There are many variations of the sit-upon... you could easily have the girls sew up all of the 3 edges - but my girls are 5-6 years old and would get tired of that quickly... plus it is NOT easy to punch those holes through 4 layers of this fabric. Much of this can be done by an adult, then the girls can do the final hand-stitching, or if your girls are older you can let them do the whole thing.
10 comments:
What a great tutorial and idea. I remember thos Brownie days. Good job to all of you.
OOOhhh, I love this....I need to make one for football season! I cant tell you how many wet behinds Ive had waiting for my 8 year olds team to get done ( at this age they dont have stadium seats! ) love it, love it, love it!!!
What a neat idea! The Sit Upon could be used for so many different things! I loved your garden post-I still haven't planted anything yet. But can't wait too!
That is so great! I really want to try to make one.
How cute are those? I'd like to make a couple too. Thanks for the tutorial! Oh, and the kiddies are adorable!
Great tutorial! Thanks for sharing!!
these are so cute, what a great idea
Sit-upons, now THAT brings back memories! Although I made mine with newspaper-stuffed WALLPAPER of all things, bound with yarn. Great tutorial.
I remember making these for Brownies out of newspaper! I've been racking my brain to remember how. Thanks for the great tutorial!
Thank you! We are doing this with our troop this Spring and I am going to use your tutorial!
Post a Comment